Saturday, December 27, 2014

How to get list of libraries and list from the host web in SharePoint hosted app

In my previous post, we have seen how to create SharePoint hosted app.

Now i want to show one more sample of SharePoint hosted app.

Here i want to display list of libraries/lists in the host web  using SharePoint hosted app.

1. Open visual studio --> Click on create project.
2. Select 'App for SharePoint' and give a name to the project.


3. In the new app for SharePoint wizard, specify where to deploy and select 'SharePoint-hosted' for type of host.


3. Go to pages --> right click on pages select add new item --> select 'Client Web Part(Host web)' and give a name to the page.


4. It will open Create Client Web part wizard, in that keep the default values and click Finish.


5. Now change client web part title and description.


6. Change the body tag as below.
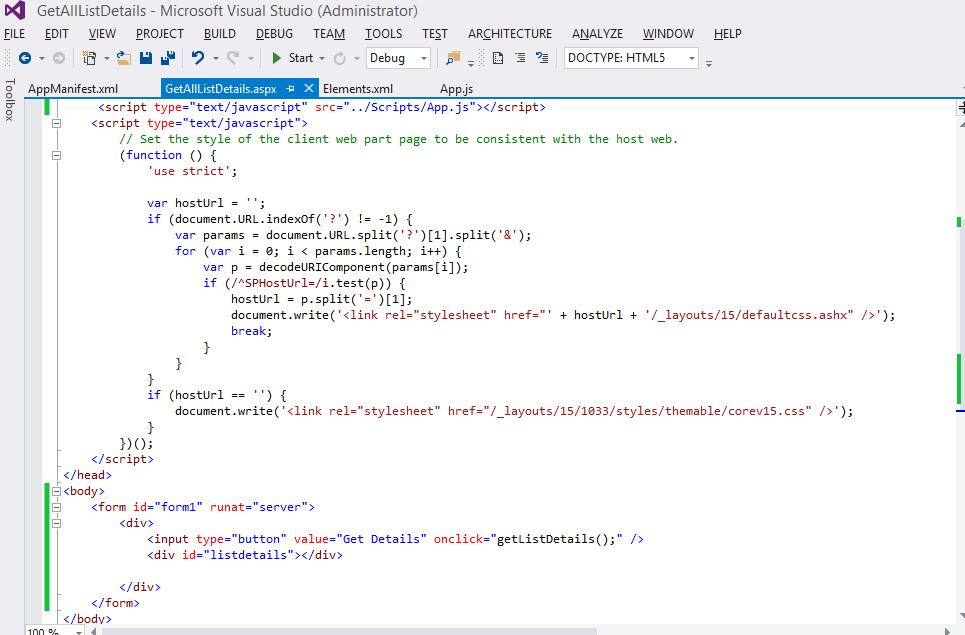
7. Now go to App.js which is in Scripts folder and modify the code as below.


8. Add App.js script link to the page.

9. Now we need to provide access permission to the app to read list data. double click on AppManifest.xml --> go to permission tab --> give propermission and save.


10. Now deploy the solution. Right click on solution and select deploy.


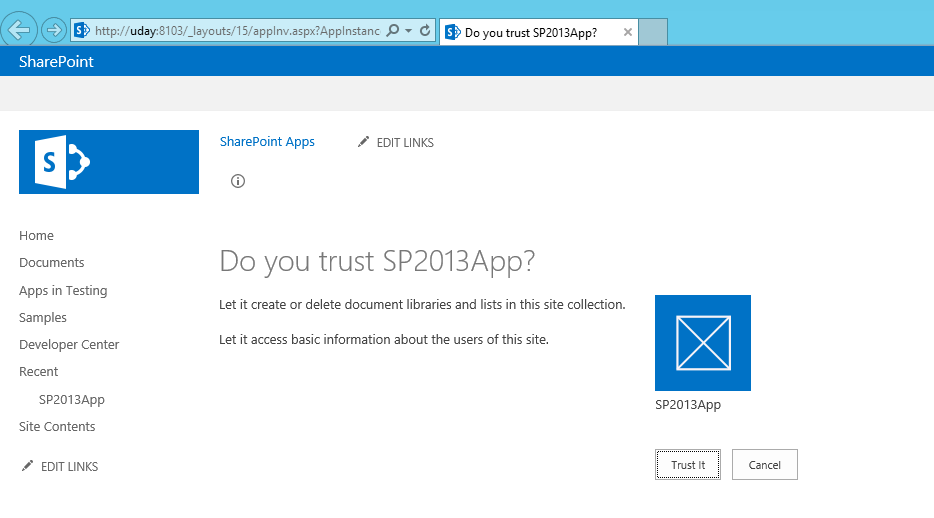
11. After successfully deployment, give automatically asking for trust. click on ok and trust it.


12. Go to a page and add the app part to the page. Click on "Get Details" button, it will show list of available libraries and list in the host web.


Friday, December 26, 2014

First SharePoint 2013 App creation (SharePoint - Hosted App)

After long time i got chance to post this blog..

Before going to create app there are few things we need to check.

1. SharePoint apps environment should be configure, i have already configured on my server please go through my previous post.
2. Before creating apps, there should be one site with has been created with developer template.
3. Farm Administror cannot deploy any app from visual studio. if farm administrator try to deploy then we can see the following error while deployment. "Error occurred in deployment step “Installed app for SharePoint”: The System Account cannot perform this action."
4. The user(not administrator) should have dbowner access on below databases.
    i. SharePoint_Config.
    ii. SharePoint_Admin_ [GUID].
    iii. WSS_ContentDB_[GUID] is the content database which is created to deploy the app.
    iv. Appmanagement_Service_DB (app management service application database).
    v. SubscriptionSettings_Service_DB (Subscription Settings service application database).

and also the user should have full control on developer site.

If the user don't have any one of the access. the below error will throw while deployment.

"Error occurred in deployment step “Installed app for SharePoint”: The local SharePoint server is not available. Check that the server is running and connected to the SharePoint Farm"

Ok now we have create one developer site for app deployment and non farm administrator have access on required database.

Now follow the below steps to create first SharePoint - Hosted app(The non farm administrator user logged on to SharePoint server). And i will show how to add the app to a page.

1. Open visual studio 2013 (Run as administrator).
2. Click on new project ( on left hand side).
3. Select Apps on left hand side which is under Installed --> Templates--> Visual c# --> office/SharePoint and select "App for SharePoint" then give a name for your project(Here SP2013App). Then click on "OK".


4. Specify SharePoint site which has been created for deployment of apps(developer site) and select SharePoint-hosted as type of host. now click on "finish" and visual studio will create app project.


5. Visual creates app project and also create some feature, packages, content types, scripts and pages.
also creates one appmanifest.xml and packages.config file.


Here i want to create an app which can be add to any SharePoint page.

for this i have to create one new page with the template of "Client web part(hosted app)".

6. Add client web part by right clicking on project you have created above and click on Add --> New Item, select "Client web part (Host Web)" and enter the name of your client web part then click on Add button.


7. After that it will show create client web part wizard, here enter your App part Name and Select the Page which you want to show on the App part, then Click on Finish. Here i want create new page so i have chosen first option.


8. now visual studio has create new page in pages folder, now we can edit app title and description by double click on page's elements.xml. Also you can set default height and width of the app.


9. Now come to the page which will show actual content in the app.

You can open the page and the line number six you have

"<WebPartPages:AllowFraming ID="AllowFraming" runat="server" />" 

which is important to allow the page to show in IFRAME.

If you don't add the above line of code snippet then it will you error as

"This content cannot be displayed in a frame" .

10. In my app part, i want to show basic details about current hosted site.

now go to <body> tag and <form> tag and one div tag to display one button along with one more div to display about site.

whenever user click on the button it has to show site details. this is the simple basic operation.

11. Modify App.js file to call the function on button click as below.


Here complete code for App.js

'use strict';

var context = SP.ClientContext.get_current();
var user = context.get_web().get_currentUser();
var oWebsite;
var hostWebUrl;
var appWebUrl;
// This code runs when the DOM is ready and creates a context object which is needed to use the SharePoint object model
$(document).ready(function () {
    getUserName();
    hostWebUrl = decodeURIComponent(manageQueryStringParameter('SPHostUrl'));
    appWebUrl = decodeURIComponent(manageQueryStringParameter('SPAppWebUrl'));
});

// This function prepares, loads, and then executes a SharePoint query to get the current users information
function getUserName() {
    context.load(user);
    context.executeQueryAsync(onGetUserNameSuccess, onGetUserNameFail);
}

// This function is executed if the above call is successful
// It replaces the contents of the 'message' element with the user name
function onGetUserNameSuccess() {
    $('#message').text('Hello ' + user.get_title());
}

// This function is executed if the above call fails
function onGetUserNameFail(sender, args) {
    alert('Failed to get user name. Error:' + args.get_message());
}

function GetDetails()
{
    var ctx = new SP.ClientContext(appWebUrl);
    var appCtxSite = new SP.AppContextSite(ctx, hostWebUrl);

    oWebsite = appCtxSite.get_web();
    ctx.load(oWebsite);
    //document.getElementById("AppPartmessage").innerHTML = "<p> My first AppPart </p>";
    ctx.executeQueryAsync(onGetDetailsSuccess, onGetDetailsFail);
}
function onGetDetailsSuccess() {
    $('#AppPartmessage').text('Site Name is: ' + oWebsite.get_title() + "\n Site description: " + oWebsite.get_description());
}
function onGetDetailsFail(sender, args) {
    alert('Failed to get site details. Error:' + args.get_message());
}
function manageQueryStringParameter(paramToRetrieve) {
    var params =
        document.URL.split("?")[1].split("&");
    var strParams = "";
    for (var i = 0; i < params.length; i = i + 1) {
        var singleParam = params[i].split("=");
        if (singleParam[0] == paramToRetrieve)
            return singleParam[1];
    }
}

12. Here the app will read the host web site details so we need to give proper permission for the app on host site. Double click on AppManifest.xml file and you can see screen as below.


13. Now build the app and deploy by right click on project and select deploy.

14. Once the app is deployed it will show the path where it has been deploy.


15. It will automatically opens the app and will show option to trust the app or not. click on trust.


16. now go to host site and add your app to any page so display the app.

go to page --> edit page--> select insert from ribbon --> click on app part --> select the app and click on OK.


Now save the page and it will looks like as below.


17. Click on "Get Details" button and it will show site title and description.


This is all about very basic SharePoint hosted app.

Thursday, December 25, 2014

ISSUE: The Subscription Settings service and corresponding application and proxy needs to be running in order to make changes to these settings.


When i was recently configuring SharePoint 2013 apps environment and trying to Configure App URLs by navigating from sharepoint 2013 central administration I got the below error.

"The Subscription Settings service and corresponding application and proxy needs to be running in order to make changes to these settings."


The above error comes when we didnt configure subscription setting services and this service we cannot configure from central admin. we can do it using power shell.

Here the script.

$account = Get-SPManagedAccount <domain\administrator>

$appPoolSubSvc = New-SPServiceApplicationPool -Name SettingsServiceAppPool -Account $account

$appSubSvc = New-SPSubscriptionSettingsServiceApplication –ApplicationPool $appPoolSubSvc –Name "Subscription Settings Service" –DatabaseName SubscriptionSettings_Service_DB

$serviceAppProxy = New-SPSubscriptionSettingsServiceApplicationProxy -ServiceApplication $appSubSvc


Sunday, December 21, 2014

Error Type: Skipping the uninstall step because the app for SharePoint is in an invalid state and cannot be uninstalled.

I was having a problem with deploying my SharePoint Hosted App into my Dev SharePoint environment.

I have updated my already deployed app and try to deployed it, for un-installation of existing it has taken around 30 mins and after that it has thrown the below error.

Error 1 Skipping the uninstall step because the app for SharePoint is in an invalid state and cannot be uninstalled.
0 0
Error 2 Error occurred in deployment step 'Install app for SharePoint': The provided App differs from another App with the same version and product ID.
0 0 SharePointAppBasics


I have opened the app host site and check all site content. Here i can see a greyed out list and saying that removing your app.


we can resolve the issue by using PowerShell command. Here the commands

$instances = Get-SPAppInstance -Web <URL>
$instance = $instances | where {$_.Title -eq '<App Title>'}
Uninstall-SPAppInstance -Identity $instance


Sunday, October 26, 2014

Configuring SharePoint 2013 app environment


For SharePoint 2013 we need one domain which you will use for apps in your environment.

You must configure a new name in Domain Name Services (DNS) to host the apps. To help improve security, the domain name should not be a subdomain of the domain that hosts the SharePoint sites.

Here am using existing domain in my machine and going to create alias name for the existing domain.

To create a forward lookup zone for the app domain name

1. Open DNS manager --> right click on Forward lookup zones --> click New Zone


2. In the new zone wizard, click on next

3. In the zone type page, select 'Primary zone' and click next.


4. In the Active Directory Zone Replication Scope page, select To all DNS servers in this domain and then click Next.


5. In the Zone Name page, in the Zone name box type the name for your new app domain name, and then click Next.


6. On the Dynamic Update page, select Do not allow dynamic updates and then click Next -> Finish.


To create a wildcard Alias(CNAME) record for the new domain name

8. Open DNS Manager --> under computer name expand Forward Lookup Zones --> Select newly created domain.

9. Right Click on the domain name and then click New Alias (CNAME).


10. In the New Resource Record dialog box, in the Alias name (uses parent domain if left blank) box, type *.

11. The Fully qualified domain name (FQDN) box displays *. followed by the domain name that you created for apps. 

12. Next to the Fully qualified domain name (FQDN) for target host box, type the FQDN of the server that hosts the SharePoint sites.


Click OK.

Create the App Management and Subscription Setting Service Applications:

You have to add two services which are required to Install and Configure Apps on SharePoint 2013.

1. App Management Service
2. Microsoft SharePoint foundation Subscription Settings Service

we have to check these two services are running or not, if not need to start these two services.
Go to Central Admin -> Click Manage Services on Server under System Settings.


Make sure that the status of App Management Service and Microsoft SharePoint Foundation Subscription Settings Service are listed as Started.

By default App Management Service started but not  Microsoft SharePoint Foundation Subscription Settings Service.


Now we need to start it, so click on start and wait for few minutes.

After that it will shows both the services status is started.


Once you came to know that App management and Subscription Settings services are running, you have to configure respective service applications.

Go to central admin -> click on Manage Service Application


Now check the two service applications are created or not.


App Management service application created by default so now we need to configure Microsoft SharePoint foundation subscription application.

we can not create application for SharePoint foundation subscription by using UI so we have to create this service using powershell only.


Now check new service application has been created.

Configure the Subscription Settings service application by using Windows PowerShell

Here the Powershell commands

$account = Get-SPManagedAccount "UKREDDY\administrator

$appPoolSubSvc = New-SPServiceApplicationPool -Name SettingsServiceAppPool -Account $account

$appSubSvc = New-SPSubscriptionSettingsServiceApplication –ApplicationPool $appPoolSubSvc –Name "Subscription Settings Service" –DatabaseName SubscriptionSettings_Service_DB

$serviceAppProxy = New-SPSubscriptionSettingsServiceApplicationProxy -ServiceApplication $appSubSvc


Now you can find the Subscription Settings service application in list of SharePoint application.


Configuring SharePoint to use App domain:

To configure the Apps for SharePoint. Go to Central admin and click on Apps.


Click on Configure Apps URL --> Enter app domain and what would be the prefix of apps in SharePoint --> OK.


we need to create an App catalog site collection to hold our Apps. When you add an App by uploading an App package, this is where you will do that.

To configure the App Catalog for SharePoint. Go to an Apps section in Central admin.

Click on Manage App Catalog --> select create a new app catalog site choice selected and hit OK.


Select web application --> Enter the Title, website address and primary site collection administrator details. It is similar like creation of site collection. Once it got created it will be redirected to "Manage App Catalog" section.


In "Manage App Catalog" section you can see newly created site and if you can click on that site it will open App catalog site.


That's it you have successfully configured the Apps for SharePoint 2013 environment.

In the next post, will see how to create SharePoint 2013 apps.